
| Sizes: | 1-3 months |
| Head circumference: | 38-40 cm |
| Needles: | straight needles 3.0 mm, 3.5 mm (long enough to hold all stitches comfortably) or circular needles 3.0 mm, 3.5 mm with a long cable for flat knitting or needle size needed to obtain gauge |
| Materials: | approx. 30 g Drops Baby Merino (50 g = 175 m) |
| Gauge: | 27 sts × 37 rounds = 10 × 10 cm in stockinette stitch on 3.5 mm needles after blocking |
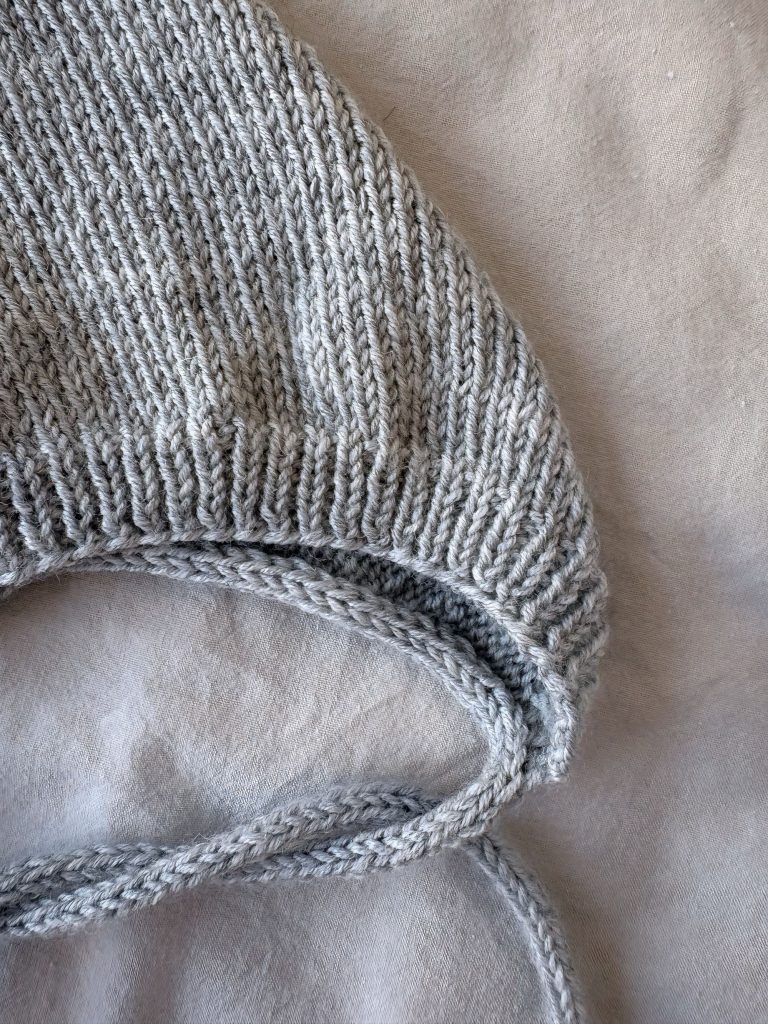
The April Bonnet is worked flat from the bottom up in stockinette stitch. The back of the bonnet is shaped with German Short Rows and is then closed using Kitchener stitch. An attached i-cord edging is worked along the lower edge of the neck and finishes in two tie strings.
Cast on 78 sts on 3 mm needles using your preferred cast-on method (I use the long-tail cast-on). The work begins with a WS row.
Rib edge
Work 1×1 rib as follows:
| Row 1 (WS): | slip 1 st (selvedge), *p1, k1*, repeat from * to * to the last st, p1 (selvedge) |
| Row 2 (RS): | slip 1 st (selvedge), *p1, k1*, repeat from * to * to the last st, p1 (selvedge) |
| Row 3 (WS): | slip 1 st (selvedge), *p1, k1*, repeat from * to * to the last st, p1 (selvedge) |
Repeat Rows 2–3 until the ribbing measures 2 cm, ending after a WS row.
Change to 3.5 mm needles. The next row is a RS row.
Main body
Work in stockinette stitch until the piece measures 13 cm from the cast-on edge. The next row is a RS row.
Short-row shaping
Place 10 markers as follows:
6 sts, place marker 1, 5 sts, place marker 2, 5 sts, place marker 3, 5 sts, place marker 4, 5 sts, place marker 5, 26 sts, place marker 6, 5 sts, place marker 7, 5 sts, place marker 8, 5 sts, place marker 9, 5 sts, place marker 10, 6 sts
Work German Short Rows as follows:
| Row 1 (RS): | knit to marker 10, turn |
Row 2 (WS): | make a double stitch, purl to marker 1, turn |
Row 3 (RS): | make a double stitch, knit to marker 9, turn |
Row 4 (WS): | make a double stitch, purl to marker 2, turn |
Row 5 (RS): | make a double stitch, knit to marker 8, turn |
Row 6 (WS): | make a double stitch, purl to marker 3, turn |
Row 7 (RS): | make a double stitch, knit to marker 7, turn |
Row 8 (WS): | make a double stitch, purl to marker 4, turn |
Row 9 (RS): | make a double stitch, knit to marker 6, turn |
Row 10 (WS): | make a double stitch, purl to marker 5, turn |
Row 11 (RS): | knit to end, working the double stitches together as you come to them |
Row 12 (WS): | purl to end, working the double stitches together as you come to them |
The short-row shaping is now complete.
Cut the yarn, leaving a tail approximately 3 times the height of the bonnet. Divide the stitches evenly onto two needles and graft them together using Kitchener stitch.

Ties
Using 3.5 mm needles, cast on 4 sts.
Work an i-cord as follows: *Knit all sts, do not turn the work, slide the sts back to the right-hand tip of the needle*, repeat from * to *.
Continue until the i-cord measures 20–30 cm.
Work an attached i-cord along the lower neck edge by picking up 1 st in each selvedge stitch as follows:
*Pick up and knit 1 st in the next selvedge stitch, slide the sts to the right-hand tip of the needle, knit 3, SSK*, repeat from * to * along the entire edge.
Then continue working i-cord until the second tie measures 20–30 cm.
Cut the yarn, leaving a tail. Thread the yarn through the remaining stitches, pull tight, and secure.
Weave in all ends.

April Bonnet Knitting Pattern | Instant Download PDF
I designed this bonnet to be worked flat with a snug, rounded fit thanks to German Short Rows. It features a clean i-cord edge that flows right into the ties, making it both durable and comfortable for daily wear.
It’s a quick, satisfying project—perfect for using up those high-quality yarn scraps we all have in our stash.
Abbreviations
| k | knit |
| p | purl |
| stockinette | stockinette stitches are made when you knit on the right side and purl on the wrong side |
| M1L | make 1 left (increase leaning to the left) |
| M1R | make 1 right (increase leaning to the right) |
| st(s) | stitch(es) |
| RS | right side |
| WS | wrong side |
Like this pattern?
Consider buying me a coffee

Leave a Reply