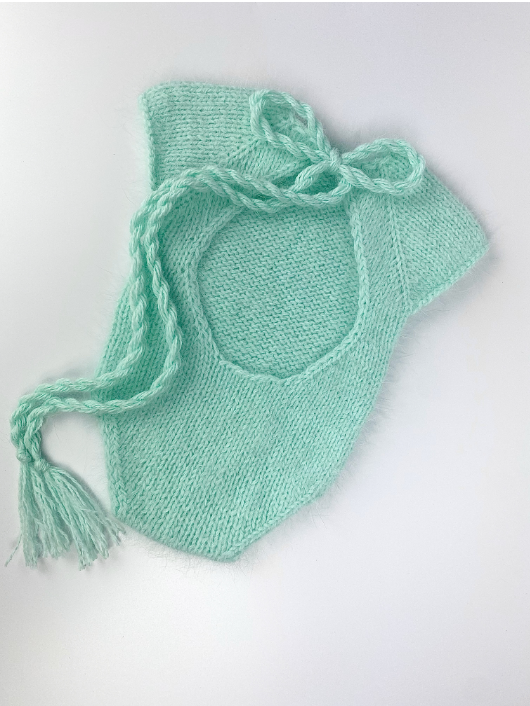
I’m so excited to share this Newborn Body with an Open Back Pattern with you!
I know how special it is to create something soft and cozy for little ones. This design keeps babies snug and adorable. I hope you enjoy making it as much as I did—let’s create something beautiful together! 🧶✨
| Size | newborn |
| Gauge | 20 sts x 28 rows = 10 x 10 cm [4 x 4 inches] in stockinette stitch on 4.5 mm [US 7] needles after blocking |
| Needles | Circular needles: 4.5 mm [US 7] / 40, 60 cm [16, 24 inches] or the required needle size to obtain gauge |
| Materials | 50 g Angora 70 (50 g = 350 m [383 yds]) 2-stranded or another yarn with the correct gauge |
The Bodysuit Droplet is worked in stockinette stitch from the top down.
About raglan increases
The raglan increases are worked on either side of a central raglan stitch, so the increase to the right of the central raglan stitch will slant right (M1R), and the increase to the left will slant left (M1L). The raglan stitch is worked in stockinette stitch, as a regular stitch. These increases are worked as follows:
| M1R: | Insert left needle under the strand between the stitches from back to front, then knit this strand through the front loop, as you would normally. |
| M1L: | Insert left needle under the strand between the stitches from front to back, then knit this strand through the back loop (twisted). |
Cast on 40 sts on 4.5 mm [US 7] / 60 cm [24 inches] circular needles with your preferred cast-on method. I use a Bulgarian cast on. Knit in flat rows.
The first row is a WS row. Purl across 1 row. The next row is a RS row.
Divide the work into sleeves, front and back by placing the following markers on either side of each of the 4 raglan sts as follows.
| Row 1: | edge st, knit 1 st, purl 5 sts (right back), place marker, p1 (raglan st), place marker, purl 6 sts (right sleeve), place marker, p1 (raglan st), place marker, purl 10 sts (front), place marker, p1 (raglan st), place marker, purl 6 sts (left sleeve), place marker, p1 (raglan st), place marker, purl 5 sts (left back), SL1 PW, p1. |
| Row 2: | edge st, knit 1 st, K2togL, knit 3 sts, M1R, k1 (raglan st), M1L, knit 6 sts, M1R, k1 (raglan st), M1L, knit 10 sts, M1R, k1 (raglan st), M1L, knit 6 sts, M1R, k1 (raglan st), M1L, knit 3 sts, K2togR, SL1 PW, p1. |
| Row 3: | edge st, knit 1 st, purl all sts, SL1 PW, p1. |
Repeat rows 2 and 3 11 more times. There are now 112 sts on the needle. The next row 26 is a RS row.
Distribution of stitches: 7 sts (right back), 1 raglan st, 30 sts (right sleeve), 1 raglan st, 34 sts (front), 1 raglan st, 30 sts (left sleeve), 1 raglan st, 7 sts (left back)).
| Row 26: | edge st, knit 5 sts, K2togR,bind off 30 sts of the sleeve purl-wise, purl 2 together, pull over right st on left, knit 32 sts, K2togR, bind off 30 sts of the sleeve purl-wise, purl 2 together, pull over right st on left, knit 4 sts, SL1 PW, p1. |
There are now 48 sts on the needle.
| Row 27: | edge st, knit 1 st, purl 44 sts, SL1 PW, p1. |
| Row 28: | edge st, knit 45 sts, SL1 PW, p1. |
| Row 29: | edge st, knit 1 st, purl 44 sts, SL1 PW, p1. |
| Row 30: | edge st, knit 45 sts, SL1 PW, p1. |
| Row 31: | edge st, knit 1 st, purl 44 sts, SL1 PW, p1. |
| Row 32: | edge st, knit 2 sts, M1L, knit 42 sts, M1R, knit 1 st SL1 PW, p1. |
| Row 33: | edge st, knit 1 st, purl all sts, SL1 PW, p1. |
Repeat rows 32 and 33 – 4 more times. There are now 58 sts on the needle. The next row 42 is a RS row.
Row 42: | edge st, knit 2 sts, M1L, knit 52 sts, M1R, knit 3 sts, cast on 8 new sts at the end of the row, join to work in the round. The round now begins here. Place a marker for the beginning of the round. There are now 68 sts on the needle. |
The next row 43 is a round row.
| Row 43: | knit 68 sts |
Work round 43 a total of 17 times.
| Row 60: | knit 13 sts, bind off 2 sts knit-wise, knit 1 st K2togL, knit 22 sts, K2togR, SL1 PW, p1, bind off 2 sts knit-wise, knit 1 st, K2togL, knit 2 6 sts, K2togR, SL1 PW, p1. |
Now work the front and back separately in rows. Turn your work and continue knitting the back section in flat rows.
Back
There are now 32 sts on the needle.
| Row 1: | edge st, knit 1 st, purl 28 sts, SL1 PW, p1. |
| Row 2: | edge st, knit 1 st, K2togL, knit 24 sts, K2togR, SL1 PW, p1. |
Repeat rows 1 and 2 – 6 more times. There are now 18 sts on the needle. The next row 15 is a WS row.
| Row 15: | edge st, knit 1 st, purl 14 sts, SL1 PW, p1. |
| Row 16: | edge st, knit 1 st, K2togL, knit 10 sts, K2togR, knit 2 sts. |
There are now 16 sts on the needle. Break the yarn 30 cm and let the sts rest, while the front is worked.
Front
There are now 28 sts on the needle.
Join yarn and begin from the purl-side row.
| Row 1: | knit 2 sts, purl 24 sts, SL1 PW, p1. |
| Row 2: | edge st, knit 24 sts, SL1 PW, p1. |
| Row 3: | edge st, knit 1 st, purl 24 sts, SL1 PW, p1. |
| Row 4: | edge st, knit 1 st, K2togL, knit 20 sts, K2togR, SL1 PW, p1. |
| Row 5: | edge st, knit 1 st, purl 22 sts, SL1 PW, p1. |
| Row 6: | edge st, knit 23 sts, SL1 PW, p1. |
| Row 7: | edge st, knit 1 st, purl 22 sts, SL1 PW, p1. |
| Row 8: | edge st, knit 1 st, K2togL, knit 18 sts, K2togR, SL1 PW, p1. |
| Row 9: | edge st, knit 1 st, purl 20 sts, SL1 PW, p1. |
Repeat rows 8 and 9 – 4 more times. There are now 18 sts on the needle. The next row 16 is a RS row.
| Row 16: | edge st, knit 1 st, K2togL, knit 10 sts, K2togR, knit 2 sts. |
There are now 16 sts on the needle. Break the yarn 10 cm. Sew the front and back with a Kitchener stitch with a thread 30 cm long.
Weave in all yarn tails and do the blocking in accordance with your yarn label recommendations. Dry on a horizontal surface. There are 3 ways to make ties on my Youtube.
Abbreviations
| k | knit |
| K2togR | right-leaning decrease stitch; knit two stitches together |
| K2togRL | left-leaning decrease stitch; knit two stitches together |
| M1L | increase; make one left (see increases) |
| M1R | increase; make one right (see increases) |
| p | purl |
| SL1 PW | slip 1, working thread in front of your work |
| RS | right side of your work |
| WS | wrong side of your work |
| st(s) | stitch(es) |
| edge st | edge stitch; slip the first stitch of a row, working thread behind your work |
Like this pattern?
Consider buying me a coffee
This pattern is for personal, non-commercial use only. The pattern may not be copied, resold or redistributed in any way.
Share your work and tag me on Instagram/Youtube: maylily knitting
Happy knitting!

Leave a Reply